Sunday, February 22, 2015

The Quick-Changing Pillow


I love throw pillows.  Love to make them.  Love the idea that you can switch them out for a quick new look in your home. And love to experiment with creative new pillow ideas...especially anything that makes that 'switching' process go super fast since I don't have a lot of time to sew these days, and anything that doesn't involve spending a lot of money on pricey new pillows from a store.  Today I'm sharing three different pillow looks I threw together pretty quickly using one basic, unadorned pillow along with--
  • Digital images downloaded from The Graphics Fairy (click here to visit this website)
  • Photo fabric
  • Black tea
  • Velcro squares (the kind that will stick to fabric)
  • Decorative trim
I must say, I've totally fallen in love with The Graphics Fairy-- thousands of digital images of every variety so generously made available for free on this website.  

Anyway.....on to the pillow show.....


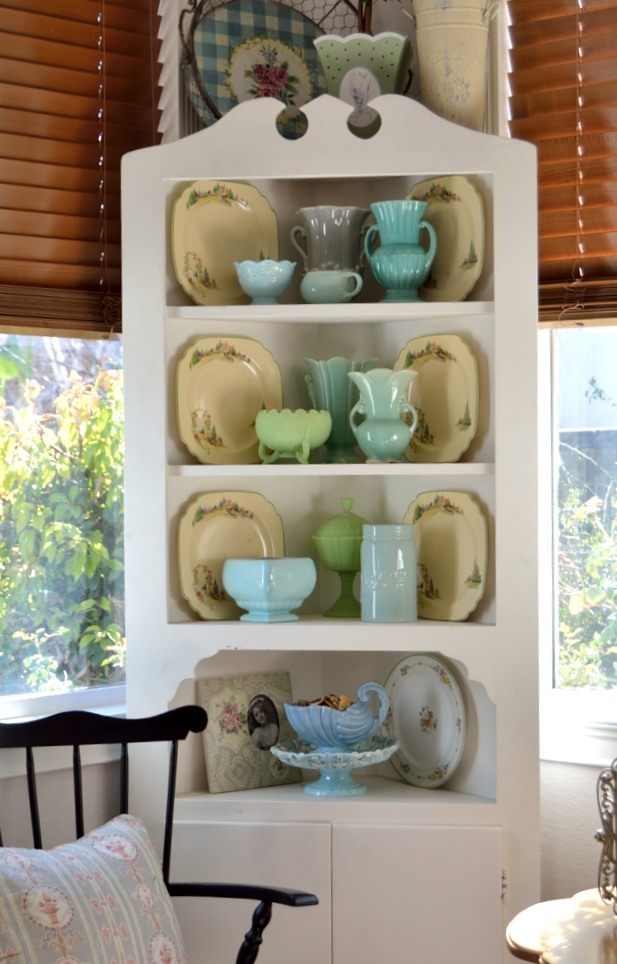
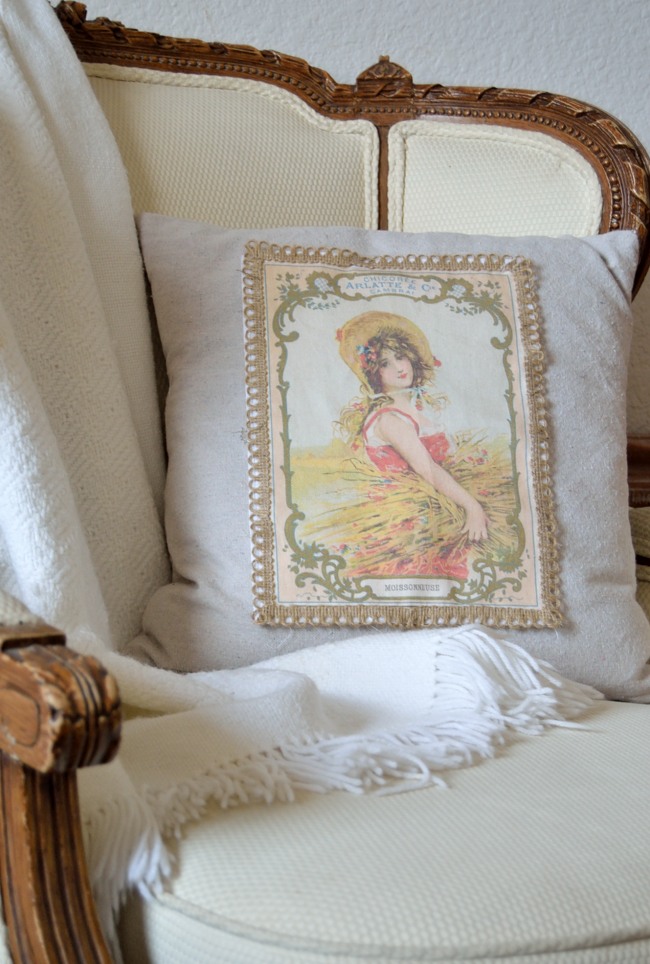
This is my favorite.  Currently it lives on a chair in our family room.


Here is the photo fabric fresh off my printer.  I decided it was a bit too white and new looking for the old, vintage label look I was going for, so I 'aged' it with in a tea bath (using black tea).


Here is the end result after the tea-bath. I added a simple grosgrain ribbon in graphite to finish the edge.  I stuck on the little Velcro squares on the wrong side for easy attachment to (and removal from) my little basic pillow....


.... Same little basic pillow, with a new look for autumn .....


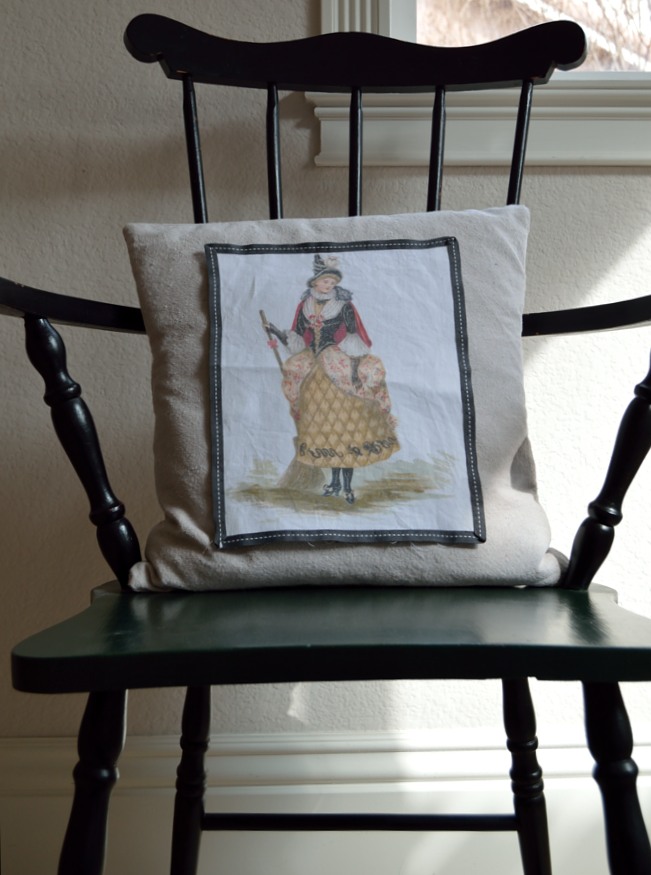
...a quick change (thanks to the Velcro) and the pillow is now wearing it's costume for Halloween.


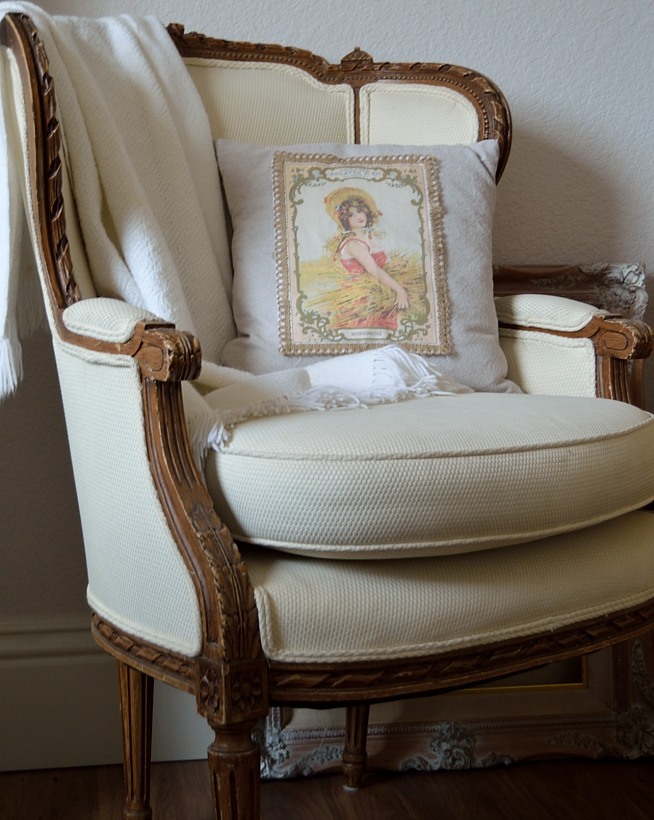
Using the Velcro makes it easy to change the look of this pillow. It doesn't have an especially sturdy grip on the pillow so this is best to use for pillows that don't get a lot of use-  one that sits on an occasional chair and serves as a sort of pillow picture frame....


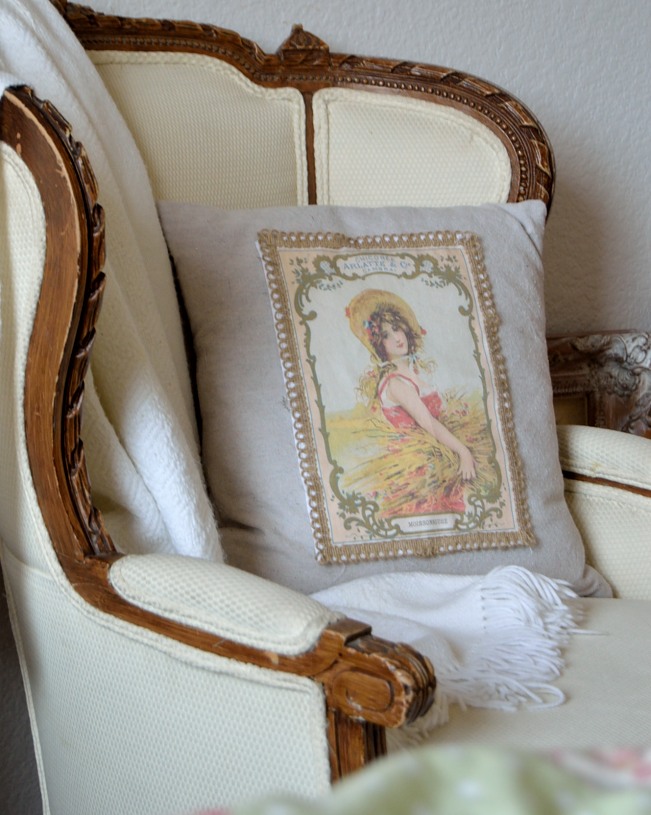
...such as the pillow above that sat in our guest room for this pic.  


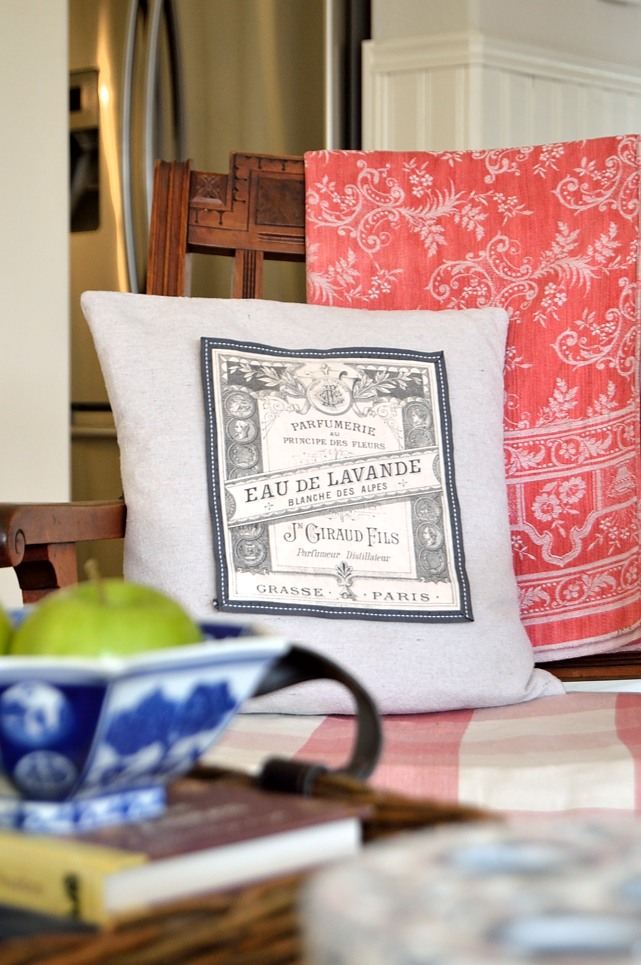
The only sewing required was to attach the trim to finish the edge on the photo fabric for each of these images, and if you wanted to, you could use fabric glue instead to attach the trim.

Thanks for stopping by!

Linking to:

The Scoop #159 at Cedar Hill Farmhouse
Inspire Me Tuesday at A Stroll Through Life
That DIY Party at DIY Showoff
Best of the Weekend at Little Miss Celebration
at Savvy Southern Style
Share Your Style #2 at No Minimalist Here
Vintage Inspiration Party at Beyond the Picket Fence
at French Country Cottage
at My Romantic Home

Sunday, February 15, 2015

The Art of Displaying a Collection


How to display a collection? How to decorate with and around a collection?   It's more of an art than a science, and since the creation and perception of art is a purely subjective activity, there are no ironclad rules, except that one rule that in my mind is paramount when it comes to collecting-- which is to collect what you love and makes you happy.  Nonetheless, while you are practicing the art of collecting and displaying your collectibles, it is helpful to be aware of a few simple rules....well, guidelines.  


The standard advise out there is to go with a common theme, group like objects, layer using a variety of sizes, shapes, and textures, and so on.  I would say that I followed this bit of advise loosely when it came to filling up my corner cabinet with my growing collection of USA ware and Fenton glassware, with a few other things thrown in because I thought it all looked nice together.  


I wasn't strict about limiting myself only to the old and vintage USA ware and Fenton stuff, there are a few new things with a vintage vibe thrown into this display....the little turquoise cereal bowl on the top shelf is new.  


Likewise this wonderful soft teal blue 'mason' jar, bought at World Market,  is brand new.... 


....but it settled in beautifully with it's older blue-green mates.  


The common theme that ties it all together is varying shades of soft celadon green, aqua, teal, and turquoise. 


Most everything you see is ceramic ware that has a vintage, old-fashioned quality....


.......texture is limited to the picture frame, the potpourri placed in a couple of the smaller pieces, and the metal planter, wire basket and faux topiary at the top of the cabinet....


......as well as the detail and texture in the design of many of the pieces themselves.  I wanted the emphasis to be on the ceramic nature of this collection...plates, vases, compotes, candy dishes, fanciful little shell creamers (I'm not sure that this piece is particularly old either).  


I added visual interest by grouping things in odd numbers and varying size and heights.  


The repetition of the charming, square-ish plates marching up each side of the cabinet lends balance to this vignette and keeps the whole collection from looking chaotic.  


The green color of the border and the foliage on the plates is repeated more or less in many of the items in this cabinet.


Altogether, the colors not only hang well together here in the corner.... 


....but work well with the touches of soft greens and blues, as well as the pinky-reds found throughout the rest of of the living room (not to mention the abundant green of my overgrown, untrimmed rose bushes glimpsed through the windows)....


Which brings us back to what I mentioned early on in this post-- collecting what you love.  I have a garden full of David Austin roses, mostly 'Abraham Darby', 'Evelyn', 'Tamora', 'English Rose', and 'Gertrude Jekyll'-- which I love for their old rose quality with their fragrant, cupped, multi-petaled blooms.  That was one of the things that attracted me to the colors of the ceramic pieces shown here (especially the USA ware)....these soft aquas and greens go so beautifully with the soft pink and apricot colors of my favorite roses. I found that I loved the way the flowing, organic lines and floral motifs of many of these vases and other ceramic pieces complemented the abundant, tumbled petals of the roses that I brought in from my garden, and as a result, that is what I tended to pick up when out and about shopping at local antique and collectible stores.


In general, when shopping, my hand tends to reach out towards anything with an old-fashioned floral pattern (especially anything with roses), a pretty red or raspberry pink on the cool side of the spectrum; soft aquas, teals, gray-blues;  and pretty vases and containers that will showcase my favorite flowers.  


And that is, in essence, the trick to successfully practicing the art of collecting and displaying your collections in your home.  Get what you love and it will be relatively easy to find that common thread or theme that can be repeated not only in the collection itself, but throughout the room, and indeed your entire house-- for chances are that if you are paying attention to what you like when you are shopping and collecting, those common elements are there in details and colors of the things you bring into your home.   


    Linking to...
    at DIY Showoff
    Best of the Weekend at Little Miss Celebration
    The Scoop #158 at Cedar Hill Farmhouse
    What We Accomplished #72 at Green Willow Pond
    Wow Us Wednesday #209 at Savvy Southern Style
    Share Your Style at No Minimalist Here
    at French Country Cottage


    Sunday, February 8, 2015

    Valentine's Day Treat: Chocolate Ganache and Shortbread


    I thought I would share one of my favorite dessert tricks because it is perfect for Valentine's Day, since it involves chocolate.  


    This is a very quick and easy way of achieving dessert perfection (chocolate = dessert perfection) with a minimal amount of prep time......


    This is my go-to dessert when I want a delicious, homemade chocolate dessert (well, almost homemade) and I don't have the time or energy to bake.  Don't get me  wrong, I LOVE to bake and usually need little encouragement to do so, but there are those rare times when I just don't feel like it (or I want a yummy chocolate dessert now and don't want to take the time to make it and know I'm not going to get anything ready-made worth my time and money at the store).  


    Simple and so easy, it involves three key ingredients: heavy whipping cream, good chocolate, and good, store-bought shortbread......


    The cream and chocolate is for the ganache, which is, essentially...... cream and chocolate.  


    All you do is heat up the cream until it simmers and add it to a bowl of broken up chocolate. I show chopped up chocolate here.....


    ......simply because I wanted the fun of using my new camera to get lots of detailed shots of the texture and ragged edges of the chopped up pieces; you do not need to take the time (and dirty the utensils) to chop up the chocolate.  


    All you really need to do is break up the chocolate bar into smaller pieces using your hands and then toss the pieces into a bowl.... where they will happily wait until you add the hot cream.  Once you add the cream, let it sit for about a minute and then use a whisk to beat the mixture until it is thick and shiny...and yummy.  See! So quick and easy.  


    Pour into a pretty bowl or teacup, place it on a plate with some shortbread, put some pretty flowers in a vase, and, voila!, you have a quick and easy Valentine's Day celebration for you and your honey.....


    ......your children.....


    ......friends and family.....  


    The shortbread gets dipped into the ganache or you can use it to make shortbread/ganache sandwiches......


    For best results I like to use Ghirardelli 60% bittersweet chocolate and Walkers Shortbread 'fingers', which work well for dipping into the chocolate.


    And here is the recipe....


    Linking to
    Foodie Friday and Everything Else at Rattlebridge Farm
    The Scoop #157 at Cedar Hill Farmhouse
    at Savvy Southern Style
    Inspire Me Tuesday at A Stroll Thru Life
    Tasty Tuesday at the New Mrs Adventures
    Whatever Goes Wednesday at Someday Crafts
    at French Country Cottage
    Best of the Weekend at Little Miss Celebration


    Monday, February 2, 2015

    Cabin Reveal Part 1


    It's been a while since I posted anything about the cabin, so I thought I would provide an update on our progress.  I'll say this, this whole project has been a total science experiment for both my husband and I, where the things we got right, as well as our mistakes, are nicely showcased for the world to see.  It's been a new experience with a steep learning curve, where we quickly learned what worked and what didn't, what to do and what not to do the next time around when we tackle the larger 'main' house (if we are ever able to figure out how that gets paid for).   


    This has been DIY (well, almost DIY) kicked up several notches for both me and my husband, because I ended designing and creating the final plans used to build the cabin, with much input from my husband regarding what was to code, structural requirements I had to pay attention to, layout, and so on.  So, before I jump into showing the cabin construction process, I'll give a little background on the design and planning, and how we ended up doing it all....


    Right around the time we closed on the property, I started to sketch plan views and floor plans on graph paper, but that was too cumbersome, too difficult to modify and tweak.   Then I downloaded SketchUp, but that didn't give me the rendering capabilities I decided I really needed.  So I did a little online research, and settled on Home Designer Suite because it seemed to offer great 3-D rendering capabilities, an extensive library of symbols for furniture, fixtures, appliances, etc.-- which I really wanted so that I could play around with the floorplan.  


    And then somewhere along the line, when I was creating multiple versions of the same tiny little cabin, trying to figure out the baffling stair design function, experimenting with rooflines with crazy dormers sticking out at odd angles (it took me a while to get the hang of some of the program elements), my husband and I decided that I could create the construction plans needed to apply for our building permit. Me.  Not an architect or professional drafter. 


    After all, how hard could it be to design a simple little box? My husband is good at building stuff, knew how things went together, and was fairly familiar the Uniform Building Code, plus our plan at that time was for him to build everything, so he could fix any mistakes as he went along (see below for how that changes). We had successfully planned, designed, and executed several home improvement projects.  It wasn't as if we were planning a complex structure cantilevered out over a cliff.   


    With that momentous decision, I realized I had to upgrade to Home Designer Pro which offered full dimensioning capabilities and the ability to create final, construction level drawings with detailed plan views, framing sections, elevations, and so on--- all things that we needed in order to submit our application for a building permit. I figured we would have spent a lot more if we had bought ready-to-go construction level plans from one of those cabin design companies or hired an architect, so I took the plunge and bought it.  And wow, did I have fun with it!


    If you ever have a hankering to design your own little get-away cabin or cottage, I highly recommend Chief Architect's Home Designer Pro  (click here for more detail on this program).  It's a CAD ('Computer Aided Design') based software program that can be used by non-architects and people that don't know anything about CAD (that's me!). You do need to take the time to go through all of the tutorials so that you can use the program properly and with a minimum of hair-tearing-out-frustration.  


    If you are leery about designing your own final house plans (or required to have architect-stamped plans), you can always purchase the cheaper Home Designer Suite (click here for more information on this program), have the fun of designing and customizing your own cabin, cottage, or house, and then send the files to a professional architect with compatible software who can fix any amateur boo-boos (yes, I had couple, as you will see later on) and then produce final construction drawings.  


    Note this is not a sponsored post, I just happen to be pretty satisfied with this software program and found that it did almost exactly what I needed it to do.  There are a number of other home design software programs out there geared to the DIY enthusiast; this website provides a good comparison and overall rating of the most popular programs.  Note these programs are also great for interior renovation and decorating projects.


    We had initially planned on my husband doing almost all of the work to save money and for the sheer satisfaction of completing a project like this ourselves...but that ended up being impossible (couldn't take that much time off). So we hired a contractor last fall to build the cabin to the 'weather-tight' stage-- foundation, framing, siding, and roof-- which he just finished a few weeks ago.   We drove out there to look it over and talk about the next steps  So....here is what has been accomplished so far.

    Foundation wall and footing excavation was the first order of business.  Too bad we didn't discover the legendary, lost bank robbery loot supposedly buried somewhere in southwestern Utah by Butch Cassidy and his gang, the Wild Bunch.  Or maybe our contractor found it and didn't tell us!


    Next came pouring the foundation walls and footing and setting in the re-bar.  That block of dirt you see in the center will cause us problems later on.... not enough got removed, which will reduce the clearance in the crawl space (for installing radiant heating in the subfloor, installing the hot water heater...).  This is one of the pitfalls of doing this kind of thing long distance and relying on photos, texts, and emails.  Things like this slip through the cracks......


    Installing the floor joists under an intense blue sky.  See that little trailer in the background?  That's the 'canned ham' that came along with our property at the insistence of the previous owners (this was actually included in our purchase agreement-- I guess they really didn't want to deal with hauling it off).  I see this as a fun, future project.  I'll 'glamp' it up and turn it into a cute little guest room...some day.  It will need to be moved, however, since it is right in the middle of one of our best views.


    Finishing touches to the subfloor on a brilliant November day.  It looks beautiful and sunny there, but it was probably freezing cold (or at least 'freezing' for my southern California blood).


    This where the difficulties of having a construction project going on in another state truly hit home.  When our contractor sent the next two photos I realized the windows and doors were wrong on the south and west walls.


    This is the one problem I had with Home Designer Pro; it does not allow you to create a framing elevation view from the outside (you can probably do this if you upgrade to their professional series, but I wasn't about to spend that much money).  You can only create a framing section that is viewed from the inside.   Our contractor assumed that the view of the framing sections in the plans was from the outside looking in (should have put a note on the plans indicating the viewpoint), which resulted in the incorrect placement of some of the windows.... what you see below is a mirror image of what window placement should be.   Luckily I caught it when looking at some of the photos our contractor sent to me.... at this stage, it was an easy fix.


    Why is the house-wrap upside down?  Who knows.  It doesn't really matter, but we couldn't help wondering anyway.


    This is where we started to get excited.  Once the siding started to go on, it finally started to look like the little cabin we had envisioned.


    This is where I also noticed another mis-step in my design.  I neglected to finish off the edge between the shingles and the ship lap.  Fixing it is an additional piece of work that we've asked the contractor to do.


    Ta-da!  We have a little house at last......


    ...this is where we step in and finish it outside and in....paint the trim on the outside, face the foundation wall with stone, install septic system, install insulation, finish plumbing, finish walls, install flooring, install a deck and stairs, install fixtures....a long list. 


    I've boarded Melissa's crazy paint train....as I write this, I have dozens of little paint sample containers sitting on my dining room table.  Trying to find the perfect colors for those finishing touches on the outside (for more on the original inspiration for colors for our cabin, please see this post).  I'll have more on how the exterior gets finished in future posts, but this is what we are thinking of for now......


    It has been enormously satisfying and rewarding to plan and design this project and then see it come to life-- if you are willing to take on something a little risky and scary, I highly recommend it.  Our goals consisted of building a little 'vacation' cabin in compliance with our water permit requirement for building a residence within a specific timeframe that could ultimately become a guest room or cabin for a larger, future house...... 


    ....maximize the amazing near- and distant views.....


    ...and do it all as inexpensively as possible, while still ending up with something that was highly customized and personal.


    Linking to:

    The Scoop # 156 at Cedar Hill Farmhouse
    That DIY Party at DIY Show Off
    What We Have Accomplished Wednesdays #71 at Green Willow Pond
    at Savvy Southern Style
    at French Country Cottage