

Everyone has heard of the term "we'll laugh about this someday", right? Well, we are just starting to chuckle (a little) about our trip back to Utah about 1 1/2 months ago to work on our cabin.
We were so ambitious about what we planned on accomplishing. Before we left, I spent months selecting and purchasing all the interior fixtures and appliances (lighting, plumbing fixtures, commode, oven/stove top, refrigerator, cabinet hardware, kitchen cabinets, butcher-block counter top, bathroom vanity/sink, and door knobs). We essentially have to bring all supplies and materials with us when we work on our cabin, since only basic hardware supplies are available in nearby small towns (the closest Home Depot is 60 miles away from our property).
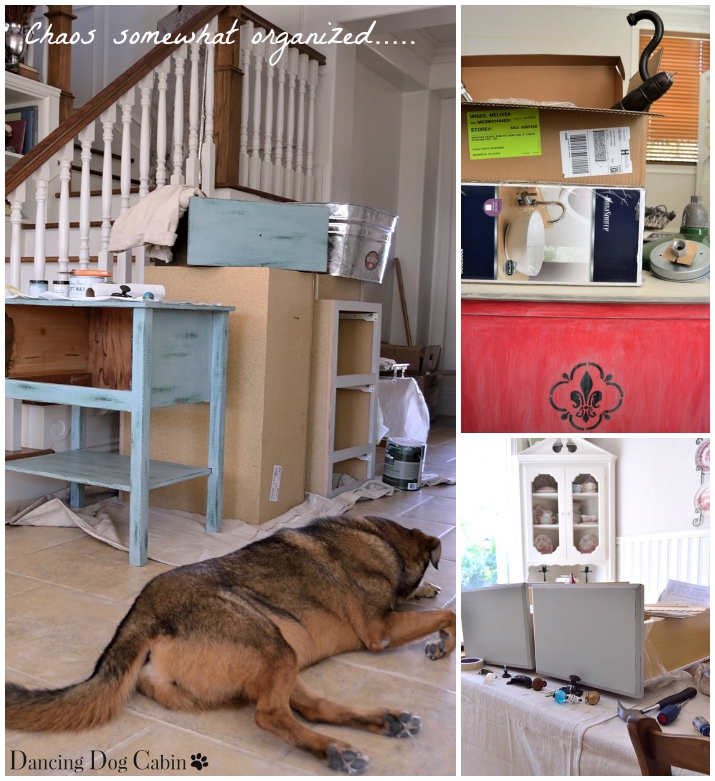
While all sorts of packages containing my Internet orders arrived daily, I busily spent whatever spare time I had left painting and distressing the kitchen cabinets, shopping local antique malls for the perfect side table/cabinet for converting to a bathroom vanity, painting and distressing it once I found it, trying to figure out how to make a galvanized steel tub work as a kitchen sink... and so on.. Here is a photo collage of this three-ring circus....
We were going to finish the insulation, install and paint the wall planks, stain and install the ceiling planks, stain the wood plank floors, get all the inside fixtures/cabinets/appliances installed AND install the culinary water and septic systems outside. And pass the insulation, water, and septic inspections while we were at it. All within two weeks (just me and my husband).

We didn't quite get it all done....but, here is quick run through of what we were able to accomplish...
Note, some of the photos were taken with a cell phone and aren't the greatest quality. It was so much easier to use my cell phone to take pictures since most of the time I was too tired to walk the few feet to the 5th wheel trailer to get my camera.
Outside
Our first week did not start out well. The heavy equipment that we rented (small excavator and small track loader) was delivered a day late, so my husband couldn't start digging right away for the water and septic systems. This was our critical path activity; we needed to get both systems (water and septic tanks and plumbing that connected both to the cabin) installed so that we could get them inspected, and still have some time to complete any punch list items that might be identified during the inspections before we had to go home again.
The incorrect plumbing fittings were delivered (more delays).
It was rainy, cold, and windy, which, in our exhausted and stressed-out state, was depressing and made unloading and storing all our perishable stuff (wall and ceiling planks, cabinets, lighting, etc.) rather tricky.
We had to figure out where to put our soon-to-be delivered refrigerator and oven/stove top so they wouldn't get wet. Couldn't put them in the cabin because we hadn't yet stained the floors, and there was no room in our little 'storage' trailer.
And then there was the wretched bulkhead fitting misadventure...I'm sure that being sleep deprived contributed to this fiasco, as did brains that were fairly oxygen deprived, thanks to the 7,000 foot elevation of our property. This happened towards the end of the week; my husband had excavated for the water tank and water line, installed the water line pipes that will deliver water from the tank to the cabin, and then back filled the water line trench. First stage of the 'waterworks' project accomplished.
He was over by the water tank, installing the various fittings and parts that connected the water tank to our water point of connection, the water line pipe to the cabin, the water pump, etc.. I was inside painting the installed wall planks. Since I like to paint, I was enjoying myself. The weather had cleared up, it was brilliant and sunny outside, and a mild breeze was blowing in through the open doors and windows. As I painted, I would periodically look out one of the windows at the lovely view. The dogs were happily asleep on the filthy, sawdust covered floor.
I heard a loud commotion outside near the trailer that we had used to haul all of our supplies to the cabin. "Where is the bulkhead fitting?", shouted my husband, as he pawed through the storage bins that sat on the trailer.
"What's a bulkhead fitting?"
"Everyone knows what a bulkhead fitting is".
"Well, I don't. Describe it to me".
After his unhelpful, technical description I remembered seeing something in my paint supply bin that just might be what he was looking for. I went outside, opened my bin, reached inside and put my hand on a round, metal, fitting-looking thing....
"I've already looked in there. It's not there."
I pulled my hand back. "OK, honey". Why, oh why, didn't I just pull the thing out anyway and wave it in front of his face?
My husband decided that he must have placed the fitting on the trailer wheel fender and that it had fallen into the nearby water line trench before it was back filled. And now it was buried. He grabbed a shovel and started to dig. After a while he jumped into the cab of the excavator, fired it up, and started to re-dig the trench with that. Looking for a little fitting the size of my hand.
A quick aside on this: my husband ordered the bulkhead fitting online, having to re-order another one would have meant more delays of up to a week. The fitting was necessary for completing the water system installation. Hence the bad temper and panic and near hysteria.
After about two hours of frustration, he stopped digging with the excavator, and went back to rummaging around in the bins on the trailer. I was back inside painting and could hear him crashing around outside again. "Oh, my God, here it is!"
I poked my head outside and saw him standing by my paint bin with that silly little bulkhead fitting in his hand. I could have thrown the table saw at him. I wanted to kick myself for not pulling out the fitting initially and forestalling two hours of lunacy.
Now, two hours of wasted time notwithstanding, the 'waterworks' project could continue its march towards completion.

One little piece not quite done is the water pump utility shed. Since the water that we piped in to our property from the road about a half mile away (click here for more information on that) is at very low pressure, we must use an intermediate holding tank (the water tank referred to above) and small booster pump to create enough pressure for household activities in the cabin (taking showers, functioning kitchen and bathroom faucets, and, ultimately, functioning dishwashers and washing machines in the future main house).
Since we didn't spend a boatload of money on the property and cabin in this scenic, remote area just to hear the hum of machinery (we get more than plenty of that perpetual urban hum at our California house), the pump is going to sit in what is essentially a hole in the ground so that the sound of the pump churning away day and night is muffled, and hopefully not audible from the cabin. To protect all the mechanical stuff sitting down in the hole, and to prevent anyone (animal or human) from inadvertently tumbling into the hole, we will build a little utility building over the top. That metal tube seen in the background of the photo above is a section of corrugated metal culvert that will be used to reinforce the hole.
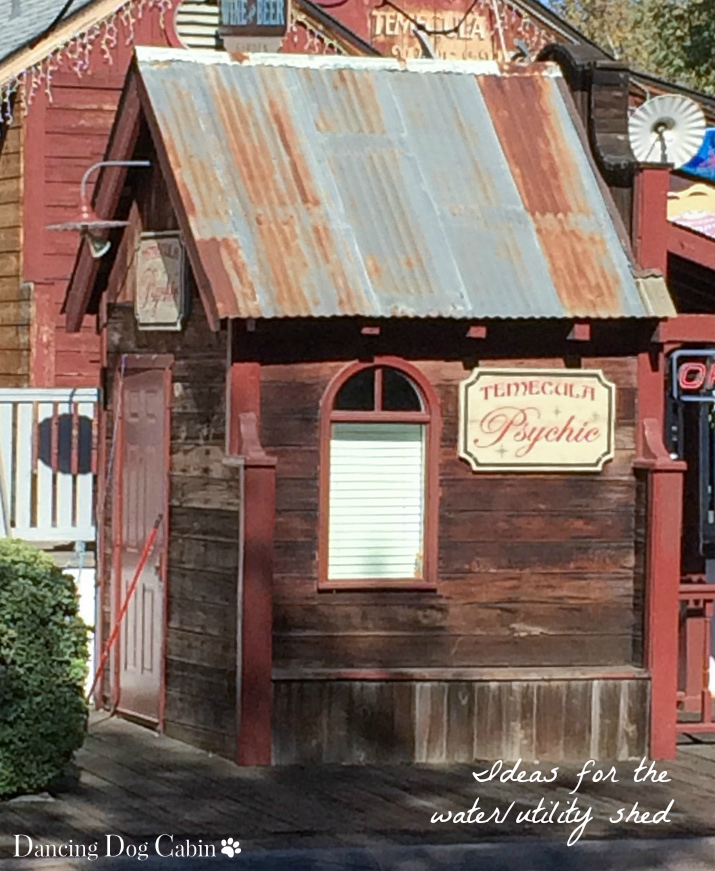
We have had many conversations about what this little building will look like. My husband wants an outhouse-looking thing (think quaint little ramshackle shack with a half moon carved into the door); I want something that will be a little more cohesive with the look of the cabin and future house.
That's about as far as we've gotten with it. My brain is too fried right now with all the zillions of decisions, big and small, that I've had to make over the past 6 months to shift back into design mode. Below is one idea for what we might do with the utility 'shed'. Although this looks nothing like the cabin, I am hazily entertaining the idea of getting really creative and fun with this and making a shed that looks something like this little building. We'll see.
***
Septic system activities were more or less concurrent with the water system project; in fact my husband excavated for both in one fell swoop. The septic system install loomed largest in our minds, however, since we were most worried about passing the septic inspection with the State Health Department. The little thumbnail sketch that served as our septic plan left a lot of room for interpretation and generated a lot of anxious second guessing and questions. Did we get the back fill right? Did we get the grade for the leach lines right? Is the separator box (the thing that sends everything from the septic tank to its final destination in the leach lines) set up right? What if the inspector makes us re-do everything?
Our biggest crises here was the huge boulder that my husband dug up in one of the leach lines. No surprises here; this part of the country is all about rocks of every size; unfortunately our equipment just wasn't able to handle this particular one. My husband ended up digging a hole off to the side of the trench and scooting the boulder over and into it with the excavator bucket.

***
It wasn't all catastrophe; once the weather turned sunny and gorgeous, I spent much of my time outside working on various projects--and what a pleasure that was. Intense blue skies, the scent of pinon and juniper, unobstructed views of dramatic red and white cliffs and the Henry Mountains blue and remote in the distance, and most of all the silence---all this elevates even the most backbreaking and menial of tasks to a whole new level.

One day I looked up to find these guys (see photo below) standing about 20 feet away and staring at me. The next day some cowboys came along and rounded them up and moved them off to wherever they belong. Unfortunately I wasn't quick enough with my phone, and wasn't able to get any photos of the cowboys as they casually rode onto our property and collected their livestock. Somehow I found this charming; so different from our everyday life at home in bland, homogeneous suburbia. I guess this is what 'open range' means.
One day I looked up to find these guys (see photo below) standing about 20 feet away and staring at me. The next day some cowboys came along and rounded them up and moved them off to wherever they belong. Unfortunately I wasn't quick enough with my phone, and wasn't able to get any photos of the cowboys as they casually rode onto our property and collected their livestock. Somehow I found this charming; so different from our everyday life at home in bland, homogeneous suburbia. I guess this is what 'open range' means.

The only fly in the ointment here is the apparent bad temper of our bovine visitors. "Range cattle are mean" said my sister, who was visiting from Salt Lake City. I instantly had a visual of one of my dogs getting kicked in the head by a grumpy steer. The upshot of this is that the dogs are not allowed to go near any visiting cattle, no matter how interested they (the dogs) may be in making 'friends'.
***
Another mission accomplished-- I finally chose the exterior trim paint colors. You can't imagine what a victory this is for me. I'm the type of person that is in total agony whenever I have to go to the paint department at any home improvement store and choose paint colors from the bazillion choices.
My usual thing is to collect dozens of paint chips, take them home, tack them up in various strategic places on the wall, stare at them, tilt my head and stare at them, walk around and think about it, go back and stare some more.....Then I go back to the store and spend too much money on lots of paint sample cans, bring it all home, paint sample-sized wood or dry wall pieces, and go through the whole process again.
This time I limited myself to about 4 to 6 red-brown and soft green colors that were close to what I wanted to use on the exterior trim. I talked about my initial process of exploring and choosing exterior finish colors in this post here.
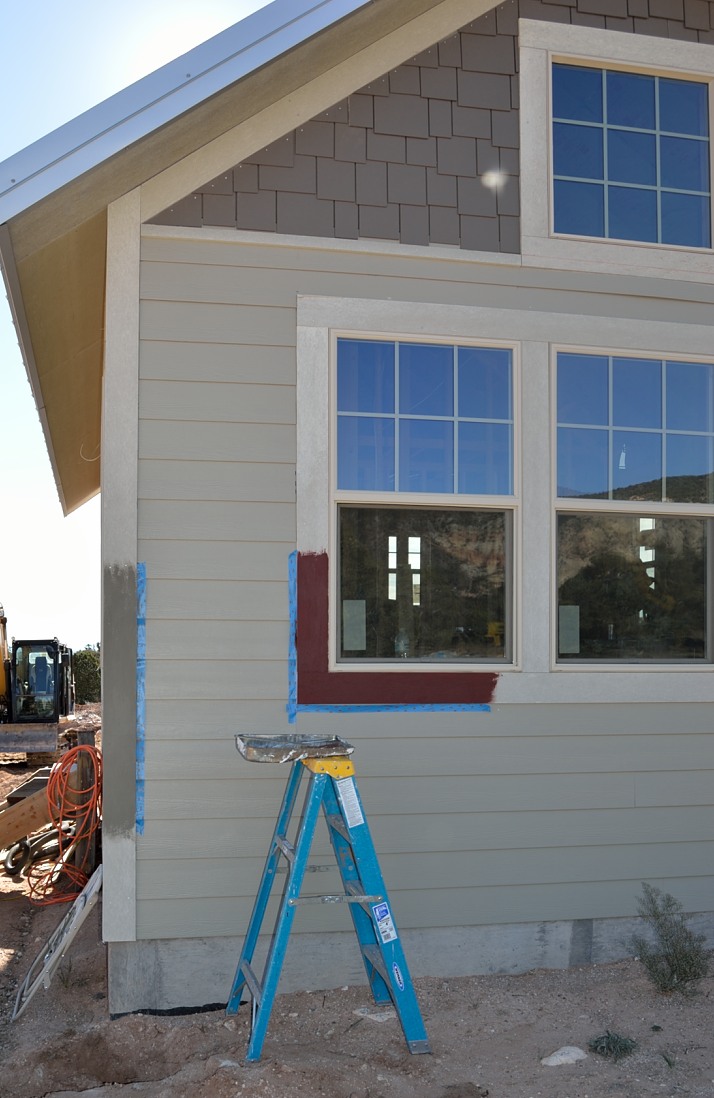
I started off by painting paint stir sticks with a couple colors that I liked the best, taped them up on the side of the cabin, stood back and stared and thought about it... and came to a decision relatively quickly.
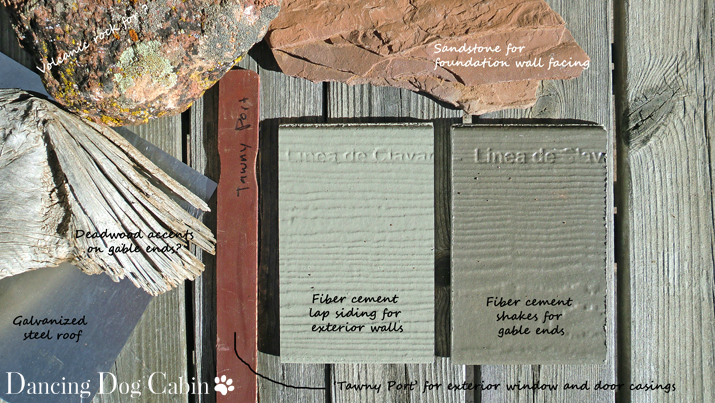
The winners are 'Tawney Port' (shown below on the window casing) which is just red enough without being too red and 'Aged Olive' (shown below on the corner trim piece), which echoes the soft green colors of the surrounding landscape. All of the window and door casings will be painted with Tawney Port, and the remaining trim will be painted with Aged Olive. Now I just have to do it; but realistically, painting the exterior trim won't happen until next spring.
Inside
I spent a lot of my time 'aging' the pine plank floors and ceiling planks.
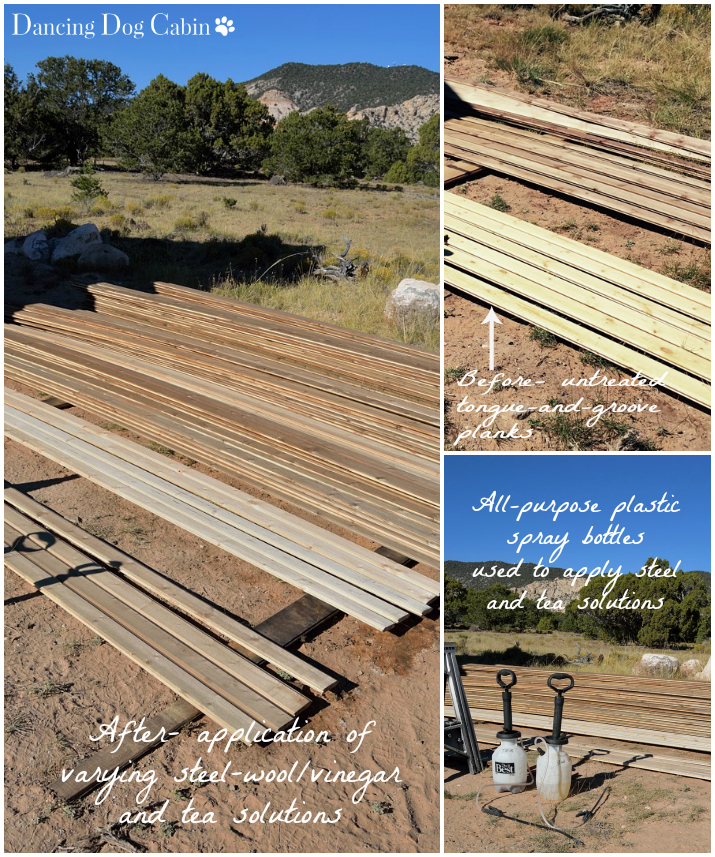
Essentially what I did for both the floors and the ceiling was to age and distress the wood using a tea solution (using black tea) and a solution created by soaking steel wool in vinegar (click here for more on this process). We wanted it to look like we used old, distressed, weathered wood for the floors and ceilings (without the expense of buying salvaged wood).
Because there was no room anywhere else, my ceiling plank aging 'factory' had to be outside; fortunately, by the time I got to this task, the weather had cleared up. The photo collage below shows 4-inch tongue-and-groove ceiling planks being aged with varying tea and steel-wool solutions. I used large, plastic spray bottles to apply the solutions to the planks outside. I also used the plastic bottles to apply the solutions to the already installed 8-inch plank floors inside.
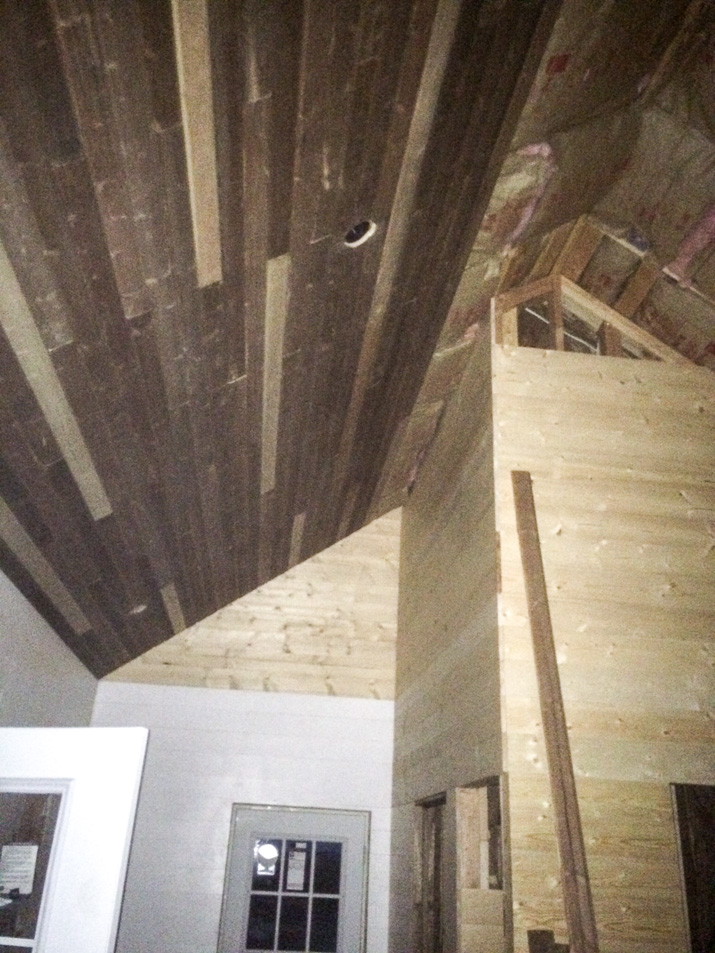
Since we don't want the ceiling to be an exact replica of the floor, and we really wanted it to have that 'salvaged wood' look, I varied both the length of time I allowed both the tea and steel-wool solutions to sit (from 2 to 5 days) and the concentration of each solution type (I added water to dilute each solution). I found that the length of time the solution sat before use really made no difference in the final result. I also found that even when using the same solution concentration, the final results were variable-- i.e. some planks turned out more gray and weathered looking, while other pieces were darker and had a red overtone using the same concentration. The planks that we purchased were all white pine, but I'm thinking that perhaps variations in sap levels, as well as different sub-species or source locations, may have contributed to the different colors.
You can see the varied finish in the photo collage above and the photo below (this photo is especially horrid; my husband took this pic at night, with his cell phone, with the flash, with the bright work light turned on).
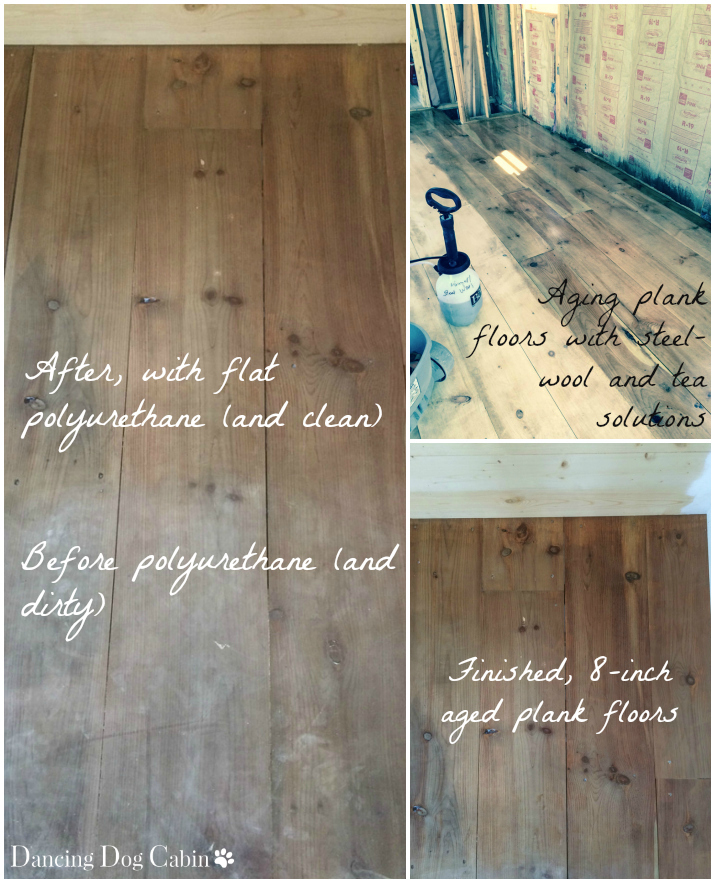
We wanted a more uniform color for the floors, so I used the same concentration of tea and steel-wool throughout the cabin. Both solutions sat for 2 days before use. The final result doesn't look particularly aged or weathered, but we both like it anyway. Its deep, rich brown color still shows all the knots and variations in the wood, as you can see in the before and after photos below.
My husband cleaned a corner in the cabin and applied a flat polyurethane finish-- which really enhances the color of the stained wood. Cleaning the floors throughout the cabin and applying a couple coats of poly is one of our remaining to-do tasks.
***
Other things that we accomplished:
- completed the insulation installation
- completed insulation of 6 inch tongue and groove wall planks
- partially painted the walls (the jury's out on the color; the white color I used may be too stark. I may need to re-paint with a warmer color-- perhaps Swiss Coffee. Another agonizing paint selection dilemma)
- purchased and stained the solid pine bathroom door
- found (but did not purchase) solid pine bi-fold doors at the local Home Depot that will work just fine for the pantry and closet
- Confirmed that the cabinets, kitchen 'sink' (galvanized metal horse feed tub), stove, and refrigerator will fit in the galley kitchenette.
Inspections that we passed:
- Insulation
- Outside water system
- Septic system (the biggie)

A big shout out and thank you to my husband, who worked like a slave and did a phenomenal job. He excavated and installed an entire water and septic system, and completed the major finish work on the inside of the cabin. This is a ton of work to complete in 2 weeks and he did most of it himself, since I had to leave after the first 1 1/2 week and go back to work.
***
In order to get our final certificate of occupancy, we still need to finish the inside, which will include installing: the kitchen appliances, kitchen cabinets, the kitchen sink and faucet, the bathroom vanity sink and commode, shower, cabinet pulls, doorknobs, lighting, closet doors, and interior plumbing. We also need to finish painting the walls and finish the floors.
This may be what we do for Thanksgiving and Christmas this year.
One aching muscle at a time, we are slowly getting to the finish line.
***
Thanks for visiting!
***
Linking to the following this week....
Roses of Inspiration Linkup at The Enchanting Rose
Inspire Me Tuesday at A Stroll Thru Life
Bouquet of Talent at Life on Lakeshore Drive
Party in Your PJs at the Cookie Puzzle
Brag-Worthy at Bless'er House
Idea Box Thursday at Mila's Little Things
Inspiration Thursday at In The New House Designs
Five Star Frou-Frou at a Tray of Bliss
Something to Talk About at Karen's Up On The Hill
Share It One More Time at DesignThusiasm
Five Star Frou-Frou at a Tray of Bliss
Something to Talk About at Karen's Up On The Hill
Share It One More Time at DesignThusiasm


What an absolutely beautiful place. You are putting your heart and soul into it and it will be so worth it.
ReplyYes, we certainly are. Thanks for visiting!
I'm so tired after reading that, I want to go lay down and I didn't even lift a finger LOL You two are doing an incredible job. I'm on the edge of my seat waiting for it to be done. I'll bet you are too ;)
Replyxo,
rue
Yes, I can't wait until we get it all finished I can start on the fun stuff- decorating and relaxing.
I've enjoyed watching the progress and seeing it all come together. Can't wait to see when it's all finished and decorated, as well as you.
ReplyYes, we can't wait either. Thanks for visiting Carol!
This is perfect! Pinned and tweeted. We appreciate you taking the time to party with us! I hope to see you on Monday at 7 pm, so we get to see your fabulous new creations. The party goes until Friday at 7 pm. Happy Sunday! Lou Lou Girls
ReplyThanks Kimberly!