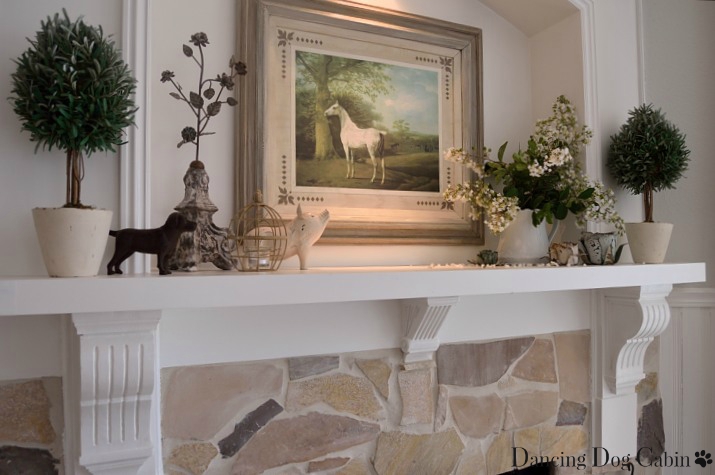
Ever since we finished our fireplace renovation I've been wracking my brain trying to come up with something really special to put in the place of honor in the mantle niche. It had to have that through-the-looking-glass quality that draws you in and makes you want to step through the frame into the scene beyond. Visiting museums is a favorite pastime for this very reason; I can spend hours in front of some paintings, looking and wondering. Sometimes there is also 'why' and a 'what' floating around in my head, such as the time I was at a museum up in Los Angeles (I think it was the LA County Museum of Art) standing in front of a large white canvas with one, huge red slash of paint. But that's the fun of looking at art, some things speak volumes to one person and say absolutely nothing to another, but no matter how you feel about it, good art gets your mind going.
The Joshua Reynolds painting below (entitled Lavinia, Countess Spencer, and Viscount Althorp) is the perfect example of a painting that can fire up one's imagination. After admiring the way in which Reynolds depicts the figures highlighted in the foreground-- the folds and draping of the woman's gown and wrap, the gleam of the little boy's sash and the sweetness of his expression (yes, that's a boy--that's how they dressed little boys back in the 18th century), the mussed-up fur of the little dog who looks up at his mistress and master with bright, mischievous eyes-- one's eye moves to the dark, mysterious woodland scene in the background. It's easy to imagine oneself walking along that road (with one's dogs, of course) that winds through the dark tunnel created by those huge trees to the open, light filled meadow beyond. I took this photo at the Huntington Library art gallery, one of my favorite places, which has an amazing collection of 18th and 19th century British portraits of a similar style by the most important English painters of that period (Romney, Reynolds, Gainsborough).

It would be easy enough to replicate something like this in my home, since websites like allposters.com or art.com sell reproductions of artists' paintings of every genre, vintage art, photography, and so on. But I wanted something a little more unique and personalized, and just buying a reproduction poster and sticking it into a suitably ornate frame seemed a little too predictable, and way too stuffy and formal and unoriginal for me. This also gets pretty expensive, since nice frames, especially large ones, as well as custom framing, can cost big bucks.
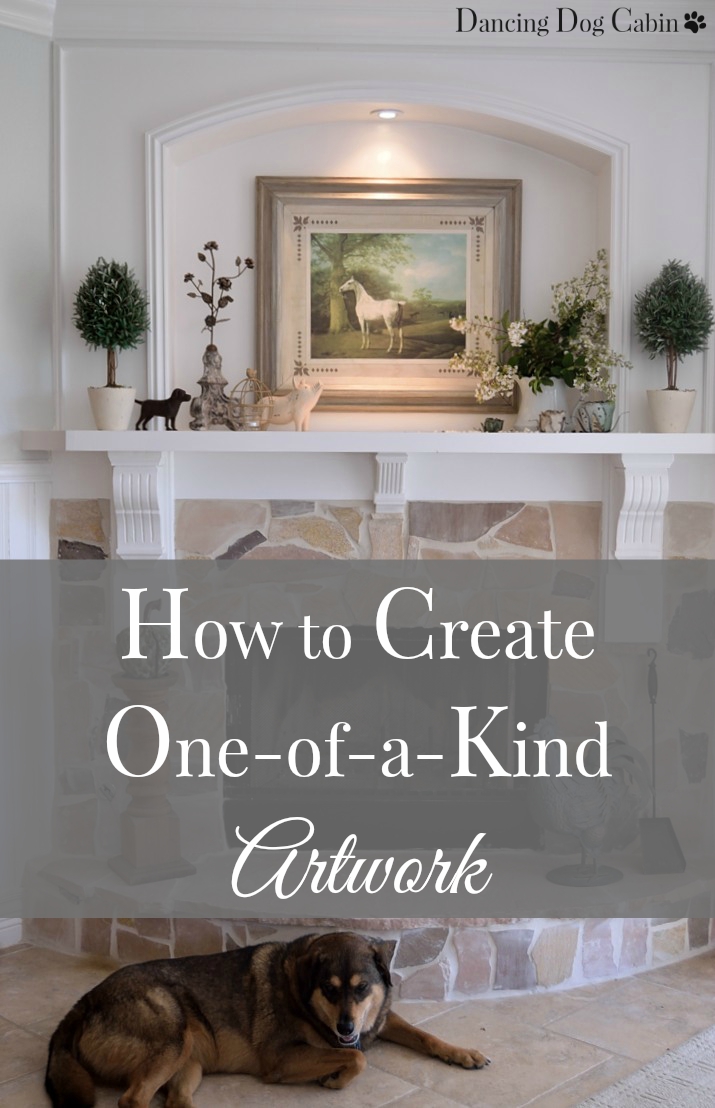
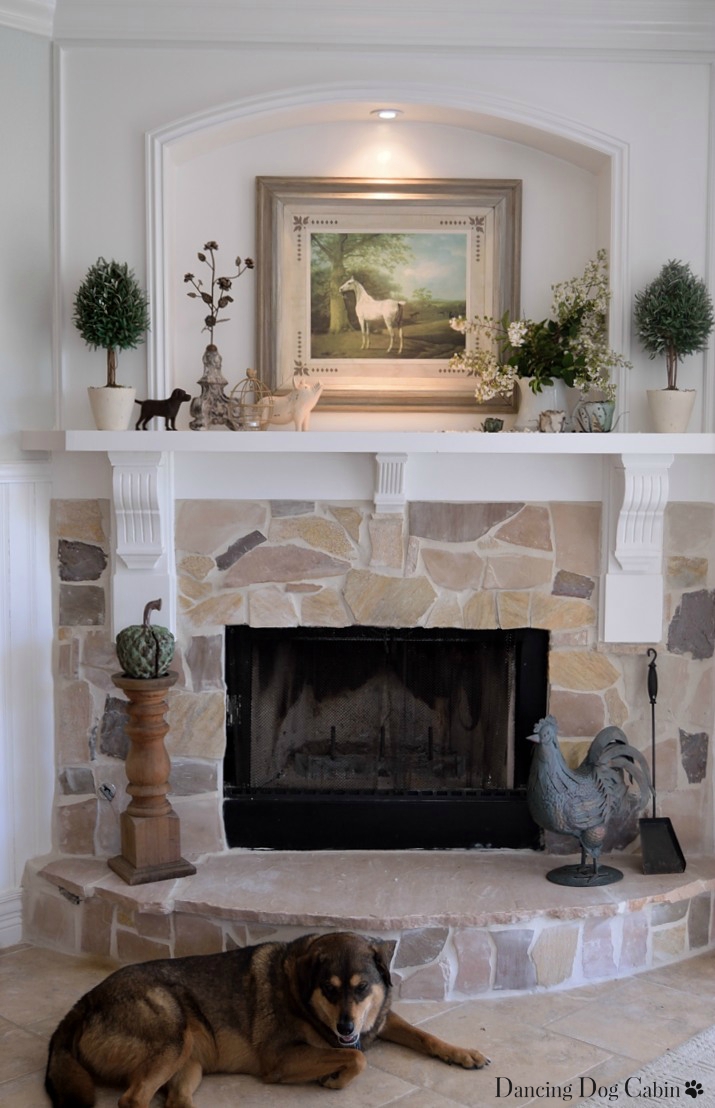
I've had the white horse painting below for a couple of years now (got it at an antique mall), but have never really cared for the matting or for the wimpy, insubstantial frame, but loved the painting itself for all the reasons cited above, and because of its subject (growing up, I had a white horse).

This is a reproduction of a painting by Jacques Agasse, a Swiss animal and landscape painter from the late 18th century and early 19th century, and as you can see, his style is very similar to the famous portrait painters of that time (comparing it to the Reynolds painting above). I can look at this all day long, not only because of the beautiful, glowing animal standing proudly in the foreground, but also because of what's going on in the background--- other horses peacefully grazing in the immediate background, the dreamy, pastoral landscape beyond...
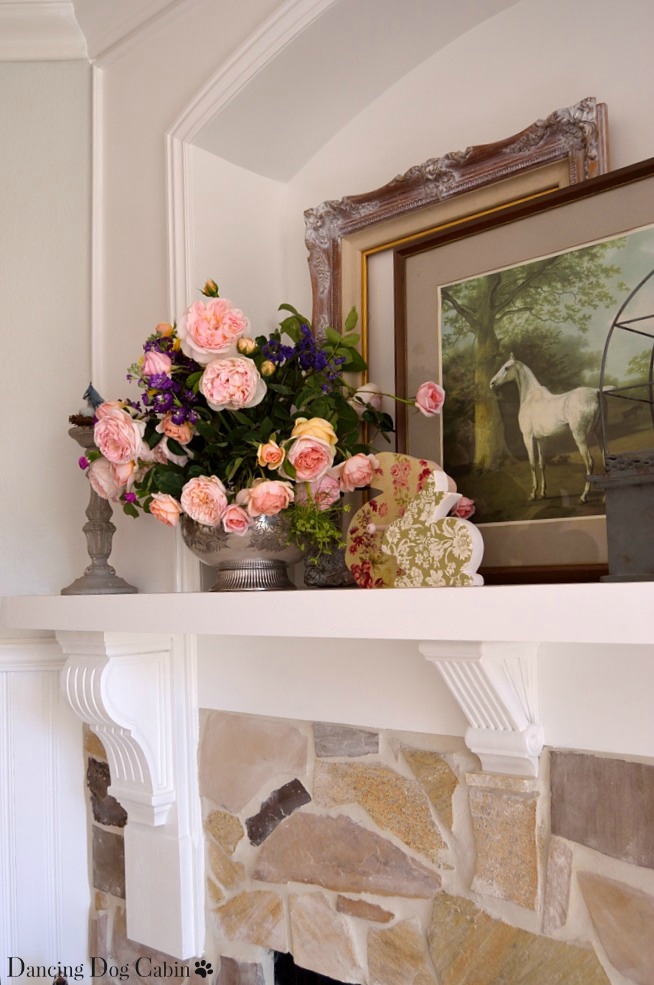
I put this picture into the fireplace niche in a sort of temporary vignette until I could figure out what I wanted to do with this space, but never really planned on leaving the horse painting here permanently since I felt the size and scale was wrong (which is why I added the empty frame behind it).

And then I found the large, gray-blue frame shown in the photo below at a local antique shop and had an 'aha' moment. I've always liked those artwork pieces where the image is either decoupaged or transferred directly onto a piece of wood or metal and then placed within a nicely distressed frame of some kind-- this type of presentation provides wonderful texture and a casual feel that works well with the Country French, industrial chic, farmhouse chic, shabby chic, vintage/flea market chic, etc. styles that are so huge right now, and which is the primary decor style of my home (with a strong leaning towards French and English Country, with vintage/flea market thrown in for good measure). While you can certainly buy this type of wall art framed and ready to go, or have art professionally mounted and framed in this manner (I believe both the websites cited above offer this type of framing and mounting service), this can get expensive. For this reason, and because I didn't want something that looked mass produced, and because I always like a fun art project, I decided to transform my horse painting into something a little more original myself by decoupaging it onto a piece of plywood and placing it into a frame with more visual heft, so that it could stay in the niche over the fireplace. Finding this frame was the perfect impetus for mobilizing my little project into high gear, since it was the right size for the fireplace, and the frame was beefy enough for the look I was after. It has a nice mix of different types of moldings without being overloaded with too much decorative ornamentation-- I wanted to create something on the rustic side of French/English/American Country that wasn't too feminine, since both my husband and I use this room every day, and too much frou-frou is a big no-no.
So, I proceeded with my scheme to transform my horse picture into something a little more unique and 'artful' in a very personal way; something that no one else would have in their home.
Read on to see how you can use old, empty frames found at flea market/antique stores, plywood from your local home improvement store, decorative stencils and paint, and any sort of artwork that catches your fancy and draws you in, to create highly original, personal artwork.
First Step:
1. Go online to find reproduction art, posters, photographs, or even clip art that speaks to you and that you would want to hang on your wall.
2. Shop local flea markets and antique malls for inexpensive empty frames at the size and style that complements your piece of art. For a minimum of construction and fooling around with molding pieces, choose a frame that already has the insert and that little innermost ledge needed to insert and hold your mounted piece of art in place.
3. Purchase a piece of plywood at the right thickness to fit into the back of the frame. I used plywood that was 3/16 inches thick. Cut the plywood down to fit into the frame opening. If you plan on painting the plywood with a wash of paint so that you can see the wood grain, be sure to get a piece of plywood with a grain pattern that you like. The plywood I used was made from birch wood.
4. If your frame doesn't already have them, purchase and attach the 'turnbuttons' using a Phillips head screwdriver. This will give you something to hold the plywood piece in place, and can be loosened with the Phillips if you want to remove and replace your artwork. You can get turnbuttons at most art supply and craft stores.
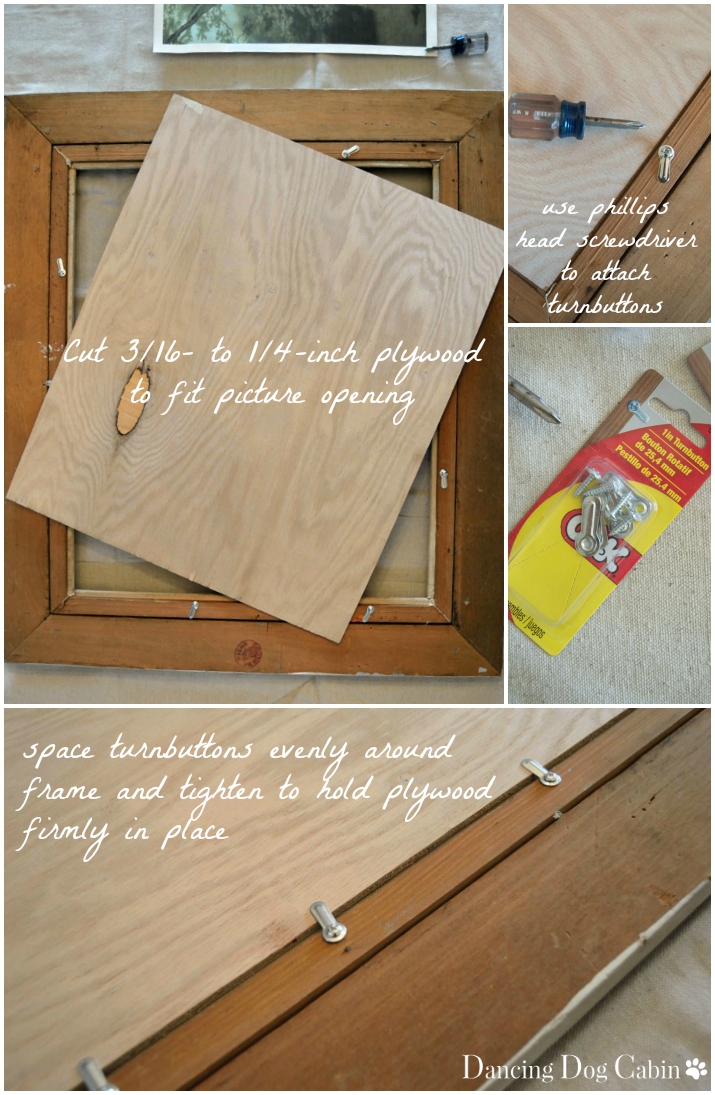
Step Two:
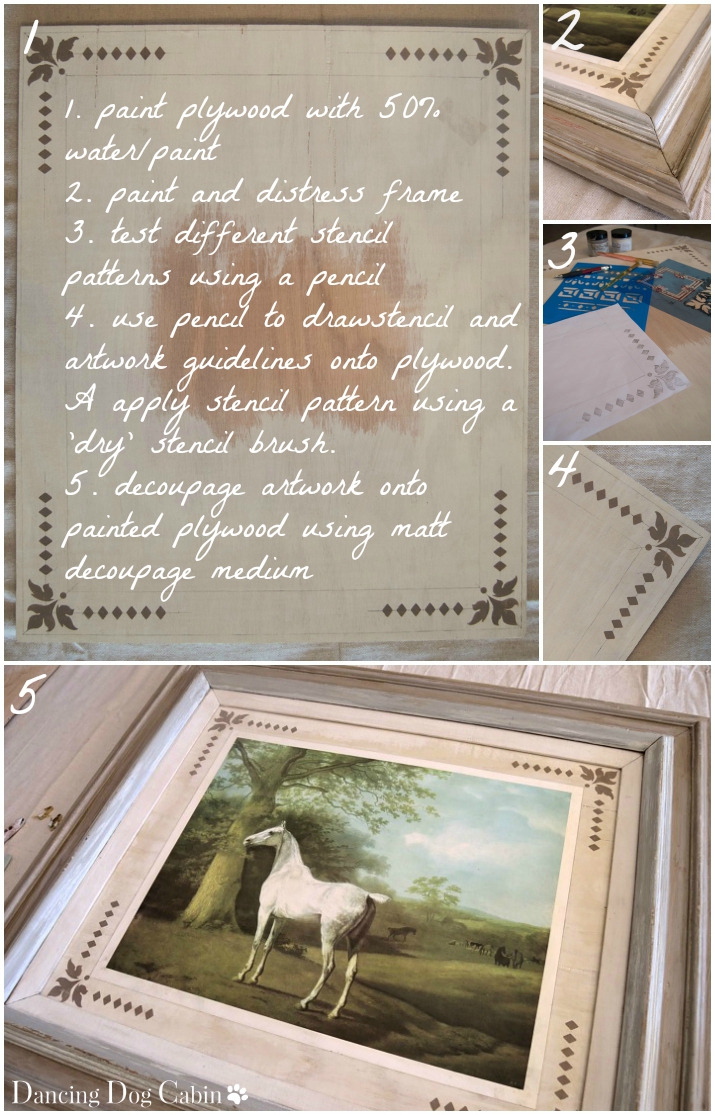
1. Paint the side of your plywood piece that you want to mount your artwork on with a color that complements your artwork. I did not want to see the knot shown above (too much rusticity for me), so I painted the other side, which was knot-free. I used a half and half mix of Annie Sloan 'Old White' and water so that the grain of the wood could just barely be seen.
2. Decide whether or not you want to use the frame as-is. In this case, I wanted a darker, neutral color to pull out some of the dark greens and browns of the painting, so I painted the outer portions of my frame using Annie Sloan 'Coco'. Painting the soft gray-blue color of the frame with this warm, chocolate-y color resulted in a wonderful medium dark, neutral brown color with slightly green undertones, which complemented all the dark greens in the painting. Leaving the innermost molding piece in the original blue-gray color draws out and complements the smoky blue color of the sky in the painting. I used Annie Sloan clear and dark wax to antique the entire frame and lightly sanded the high points and molding reliefs to give it an interesting, distressed, 'antique' look. You never know what you will find when you buy old frames that have been doctored up-- in this case, when I started sanding, I discovered that the frame must have originally been covered with a gold or bronze finish. A wonderful bonus in this case, for where I was especially vigorous with my sanding, I got the barest hint of bright, gold gilding showing through the paint.
3. For extra decoration, use stencils to frame or complement your artwork. In this case I wanted something fairly simple, and not too complicated. I used a repeated diamond pattern as a basic frame for my horse painting and a leaf pattern that echoes the leaves on the big tree behind the horse. Using a pencil to fill in and try out different stencil patterns is a great way of finding the right decorative pattern works well with your artwork. In this case, I placed pieces of paper with different penciled-in stencil patterns behind my horse painting to get a sense of which would look best as a frame for the finished product.
4. Use a mechanical pencil to draw guidelines for the stencil placement and the artwork itself. This is an important step that ensures that your stenciled pattern and artwork are centered and placed correctly on the plywood and within the frame. I attached my painted plywood piece to the frame using the turnbuttons, and then used pencil to mark the location of the inner edge of the frame. I measured inward from this first line to center penciled guidelines for the stencil pattern as well as the penciled-in outline of my horse painting (for placing and centering the painting during the decoupage step).
Once your guidelines are in place, use a stencil brush that is loaded with a minimal amount of paint. Barely dip the bristles into the paint and then blot it well on a scrap of paper; this ensures that the stenciled pattern will have a clean, crisp edge and that a minimum of paint bleeding will occur. I used Annie Sloan 'Coco' again for the stencil pattern. I wanted the pattern (as well as the frame) to complement the horse painting without overwhelming it.
5. This was the scary part for me, since once you start painting glue on your artwork, there's no turning back. Decoupage your artwork onto the painted/stenciled plywood, using your penciled in guidelines from the previous step to ensure that your artwork is centered on the plywood and within the frame. Pencil marks that aren't covered by paint, can be erased, but be sure to erase all pencil marks (except the penciled-in guidelines for your artwork) before applying any decoupage. I used matt decoupage, which you can find in any craft store. It's a good idea to practice with an old poster of similar size and with a paper weight similar to what you will be working with before you start working with your artwork.
Once you've coated the plywood and the back of your artwork with the decoupage medium, place it onto the piece of plywood, using the penciled-in guidelines to center it. Apply more decoupage medium to your artwork with a paintbrush, and then use your fingers (after dipping them into water) to smooth out any air bubbles and wrinkles, working methodically from the center to the edge of the paper. You may need to use a pin to prick and remove any stubborn air bubbles and wrinkles that you aren't able to remove with your hands. Allow the decoupaged plywood to dry for up to 24 hours before inserting it into your frame. Fortunately any bubbles and wrinkles that you aren't able to remove, go away as the piece dries; lucky for me, for there were a few persistent wrinkles on my poor horse that I couldn't get rid of during the final stage.
Step Three:
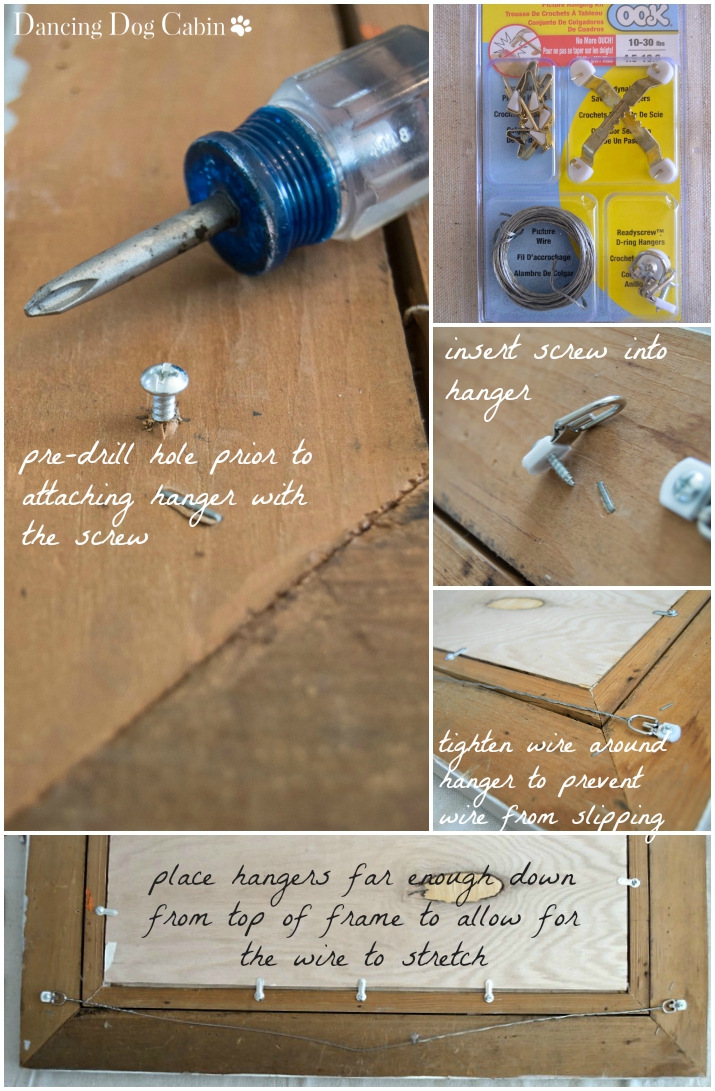
1. If your frame doesn't have any, insert hanging hardware. I used the d-ring hanger and wire variety shown below for easy leveling and adjustment of the picture, and used picture hooks and nails to hang it all on the wall. So that the hanger/screw assembly goes in easily and sits flush against the frame, partially screw in the screw first without the hanger. I found that it was helpful to insert the screws all the way into the pre-drilled holes in the hangers before screwing everything into the pre-drilled holes in the frame to ensure that the hangers lay flat.
2. Attach the hanging wire. Be sure to give yourself plenty of extra wire so that you can wind it tightly around each d-ring hanger and eliminate any slipping. Also be sure to place the hangers far enough below the top of the frame since the wire will stretch once you hang your picture (you don't want to see the picture hooks and wire above the artwork, all this should be hidden by the picture frame once you have hung it on the wall).
Last step.... hang your finished piece, step back, and admire your handiwork.

Thanks for visiting!
Linking to the following this week....
Roses of Inspiration Linkup at The Enchanting Rose
Bouquet of Talent at Life on Lakeshore Drive
Party in Your PJs at the Cookie Puzzle
Share Your Cup Thursday at Have a Daily Cup of Mrs. Olson
Frugal Friday at The Shabby Nest
Inspiration Thursday at In The New House Designs
at Funky Junk Interiors
at Funky Junk Interiors